Metadata Mapping
Metadata is the supporting data your transactions point at: the chart of accounts, tax codes, classes, locations, departments, payment terms, payment methods, and customer categories. Your source system has its own list of these, and so does NetSuite. Metadata Mapping is where you tell SuiteMigration which NetSuite record each source value corresponds to.
This has to be done before you push. A transaction that references an unmapped account or tax code has nowhere to land in NetSuite, so it will either fail on push or post to the wrong place. Mapping is also what the NetSuite pre-checks and several validation rules read from, so an incomplete mapping set will show up as failures in the Migration Readiness Audit.
Open it from a migration under Metadata Mapping.
Before you start
Both connections need to be in place for the tabs you will actually map. The migration must be connected to a source (QuickBooks Online, QuickBooks Desktop, Xero, or a source NetSuite account) and to a destination NetSuite account. Until both exist, those tabs tell you which connection is missing instead of showing the table.
The exception is Item Categories, which is display-only. It needs only the source connection and renders fine without a destination. Everywhere this article says mappable tab, it means every tab except Item Categories.
You also want the source data synced and the destination metadata pulled, since the two dropdown lists are built from whatever each side last returned.
The workflow
The same steps work on every mappable tab.
- Open a tab and look at how many rows are unmapped.
- Run Auto-Map by Name. It fills the exact matches and leaves you the ambiguous rows.
- Click Save Mappings. Do this before running Auto-Map by AI, and see the warning below.
- Run Auto-Map by AI if you want suggestions for the rows still empty.
- Work through what is left by hand, using the search box in each dropdown.
- Map the Blank Value row if your source has records with the field left empty. Accounts has no such row; see below.
- Click Save Mappings again, then move to the next tab.
Save before you run Auto-Map by AI
Auto-Map by AI reloads the last saved state before it starts, so it can be re-run cleanly. Anything you have not saved is discarded at that point, including a whole Auto-Map by Name pass. Always save first.
Once every mappable tab is saved, run the Migration Readiness Audit and the NetSuite pre-checks. They will tell you if anything is still unmapped or mapped incompatibly.
How the screen works
Each metadata type gets its own tab across the top:
Payment Terms, Customer Categories, Tax Codes, Classes, Accounts, Locations, Departments, Payment Methods, and Item Categories.
Inside a tab you get a two-column table. The left column lists your source values. The right column is a searchable dropdown of the matching NetSuite records. Pick the NetSuite record for each source row.
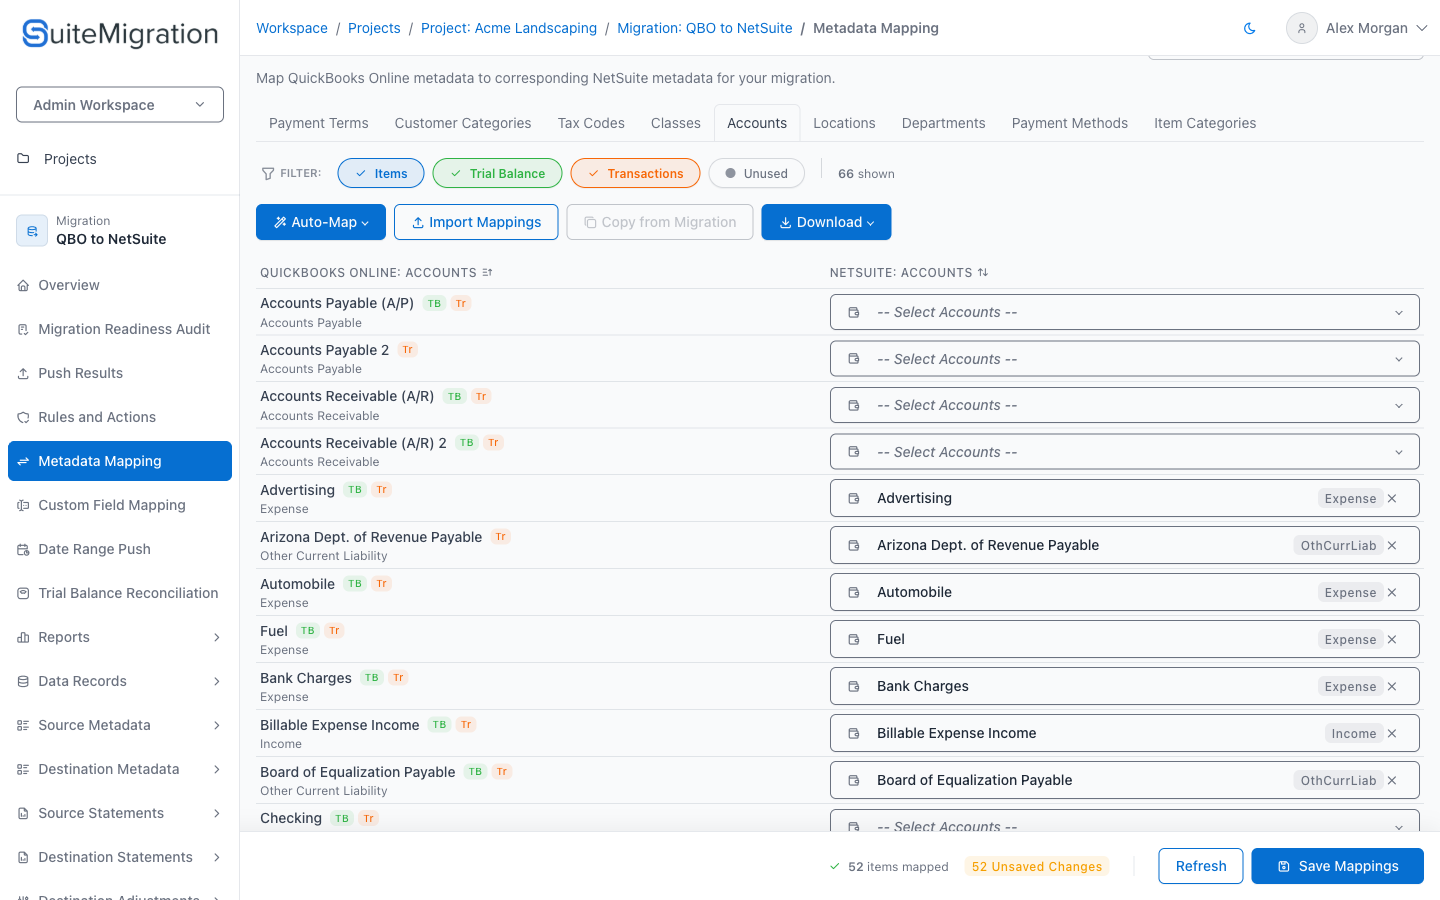
Both columns are sortable. Click the source or destination header to sort by name, which is a quick way to group the unmapped rows together.
At the bottom of the screen a sticky bar shows how many items are mapped and how many unsaved changes you have. Nothing is stored until you click Save Mappings. Refresh discards unsaved edits and reloads what is saved on the server.

Tabs each save independently, so map a tab, save it, and move on.
The Blank Value row
Every mappable tab except Accounts has a Blank Value row pinned to the top. It stands in for source records that left the field empty. If your source has invoices with no class on them, mapping Blank Value on the Classes tab decides what class those invoices get in NetSuite. Leave it unmapped and those records simply carry no class across.
Accounts is the exception. It has no Blank Value row, and a blank-value mapping is not saved there even if one somehow existed, so there is nothing to set on that tab.
The tabs
Accounts
Usually the longest tab. Source accounts are shown as number name when the source has an account number, with the source account type printed underneath.
Above the table there are four filter chips that describe how each account is actually used in your data:
- Items (I) - the account is referenced by an item, for example an income or COGS account on a product.
- Trial Balance (TB) - the account carries a balance in the trial balance.
- Transactions (Tr) - the account is hit by at least one transaction.
- Unused (U) - nothing references the account.

Unused is off by default, which is deliberate. Most charts of accounts carry dead accounts that were never posted to, and there is no reason to map them. Turn the chip on if you want to see them anyway. The count next to the chips tells you how many rows are currently showing.
A source account may carry a subtype badge. Today the only one is Undeposited Funds. It needs care: NetSuite has exactly one Undeposited Funds account and it cannot be recreated, so the badge is telling you which specific NetSuite account to point at.
A/P and A/R accounts are deliberately not badged, because the markers the source systems use for them are not reliable enough to act on. Those rows still need your attention, they just do not announce themselves.

Tax Codes
Rows are your source tax rates, with the rate percentage shown next to the name, mapped to NetSuite tax codes.
This tab has an extra All / Used only toggle. Used only narrows the list to tax rates that actually appear on transactions, which usually cuts a long list down to something manageable. Start there, and switch to All only if you need to map something that has not been used yet.
If tax is not coming across on a QuickBooks Online migration at all, the problem is usually upstream of mapping. See Set Up SuiteTax in NetSuite.
Locations and Departments
These two tabs share one source list, on every source system.
The reason is a QuickBooks Online one: QuickBooks Online tracks locations and departments as a single list, and some accounts relabel that list "Location". NetSuite has two separate dimensions. SuiteMigration keeps the merged behaviour on every source, so you will see it on Xero and QuickBooks Desktop migrations too. So SuiteMigration shows the same merged source entries on both tabs and lets you decide independently: map an entry to a NetSuite Location on the Locations tab, and to a NetSuite Department on the Departments tab. A blue banner at the top of each tab reminds you of this.
You do not have to use both. Map only the tab that matches how you want the dimension to land in NetSuite. Mapping an entry on both tabs is fine too, and means the entry lands as both a Location and a Department in NetSuite.
Classes, Payment Terms, Payment Methods, Customer Categories
Straightforward name-to-name tabs. Source value on the left, NetSuite record on the right. These are usually the fastest tabs to finish with Auto-Map by Name.
Item Categories
Display only. Category-type items are listed so you can see what is in your source, but they are not mapped and there is nothing to save here.
Mapping faster
You do not have to fill in every row by hand.
Auto-Map by Name
Matches source values to NetSuite records with the same name, ignoring case and surrounding whitespace. On the Accounts tab it matches on number name combined, so a source account 4000 Sales Income matches a NetSuite account named 4000 Sales Income.
It only fills rows that are currently empty, so it will never overwrite a mapping you already made. It skips Blank Value. When it finishes it tells you how many rows it matched, or that it found no new matches.
Run this first on every mappable tab. It usually clears most of the list, leaving the ambiguous rows. Then save, before you reach for the AI.
Auto-Map by AI
Available on every mappable tab. On Accounts and Tax Codes it sits inside the Auto-Map dropdown alongside Auto-Map by Name; on the other tabs it is a button of its own. Those two tabs are where it earns its keep, since names rarely match exactly and the account type matters, but nothing stops you using it elsewhere.
Save your work first
Auto-Map by AI reloads the last saved state before it runs, so it can be re-run cleanly. Any unsaved changes, including a full Auto-Map by Name pass, are discarded when it starts.
Choosing a model and a threshold
Clicking Auto-Map by AI does not start a run. It opens a Select AI Model dialog with two decisions:
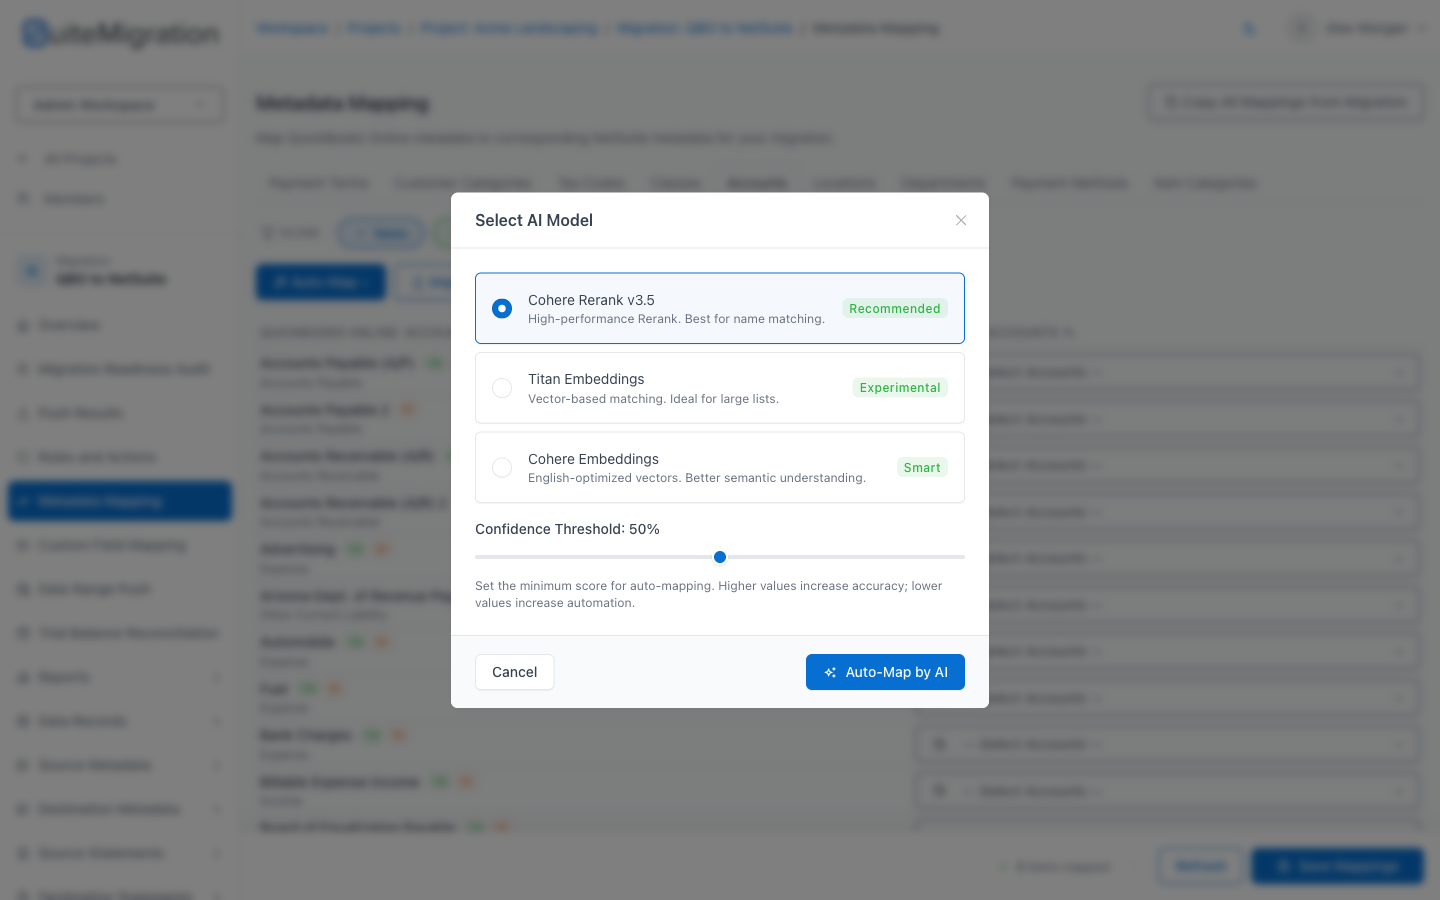
- The model. Each option carries a one-line description and a badge, for example Recommended on the rerank model, which is the better choice for name matching.
- The Confidence Threshold, which defaults to 50%. This is the minimum score a suggestion needs before SuiteMigration will fill it in. Raise it for fewer but safer suggestions; lower it to have more rows filled and more to review.
Click Auto-Map by AI in the dialog to start the run.
Because the threshold is the floor for what comes back, it decides what you see in the Confidence column next. Raise it to 80% and the amber and red rows below simply will not be suggested at all.
Reading the Confidence column
Every AI suggestion comes with a Confidence column, shown as a percentage and colour coded: green above 80%, amber between 50% and 80%, red below 50%. Sort by that column and review the low-confidence rows first. These are suggestions, not decisions. Nothing is committed until you save.
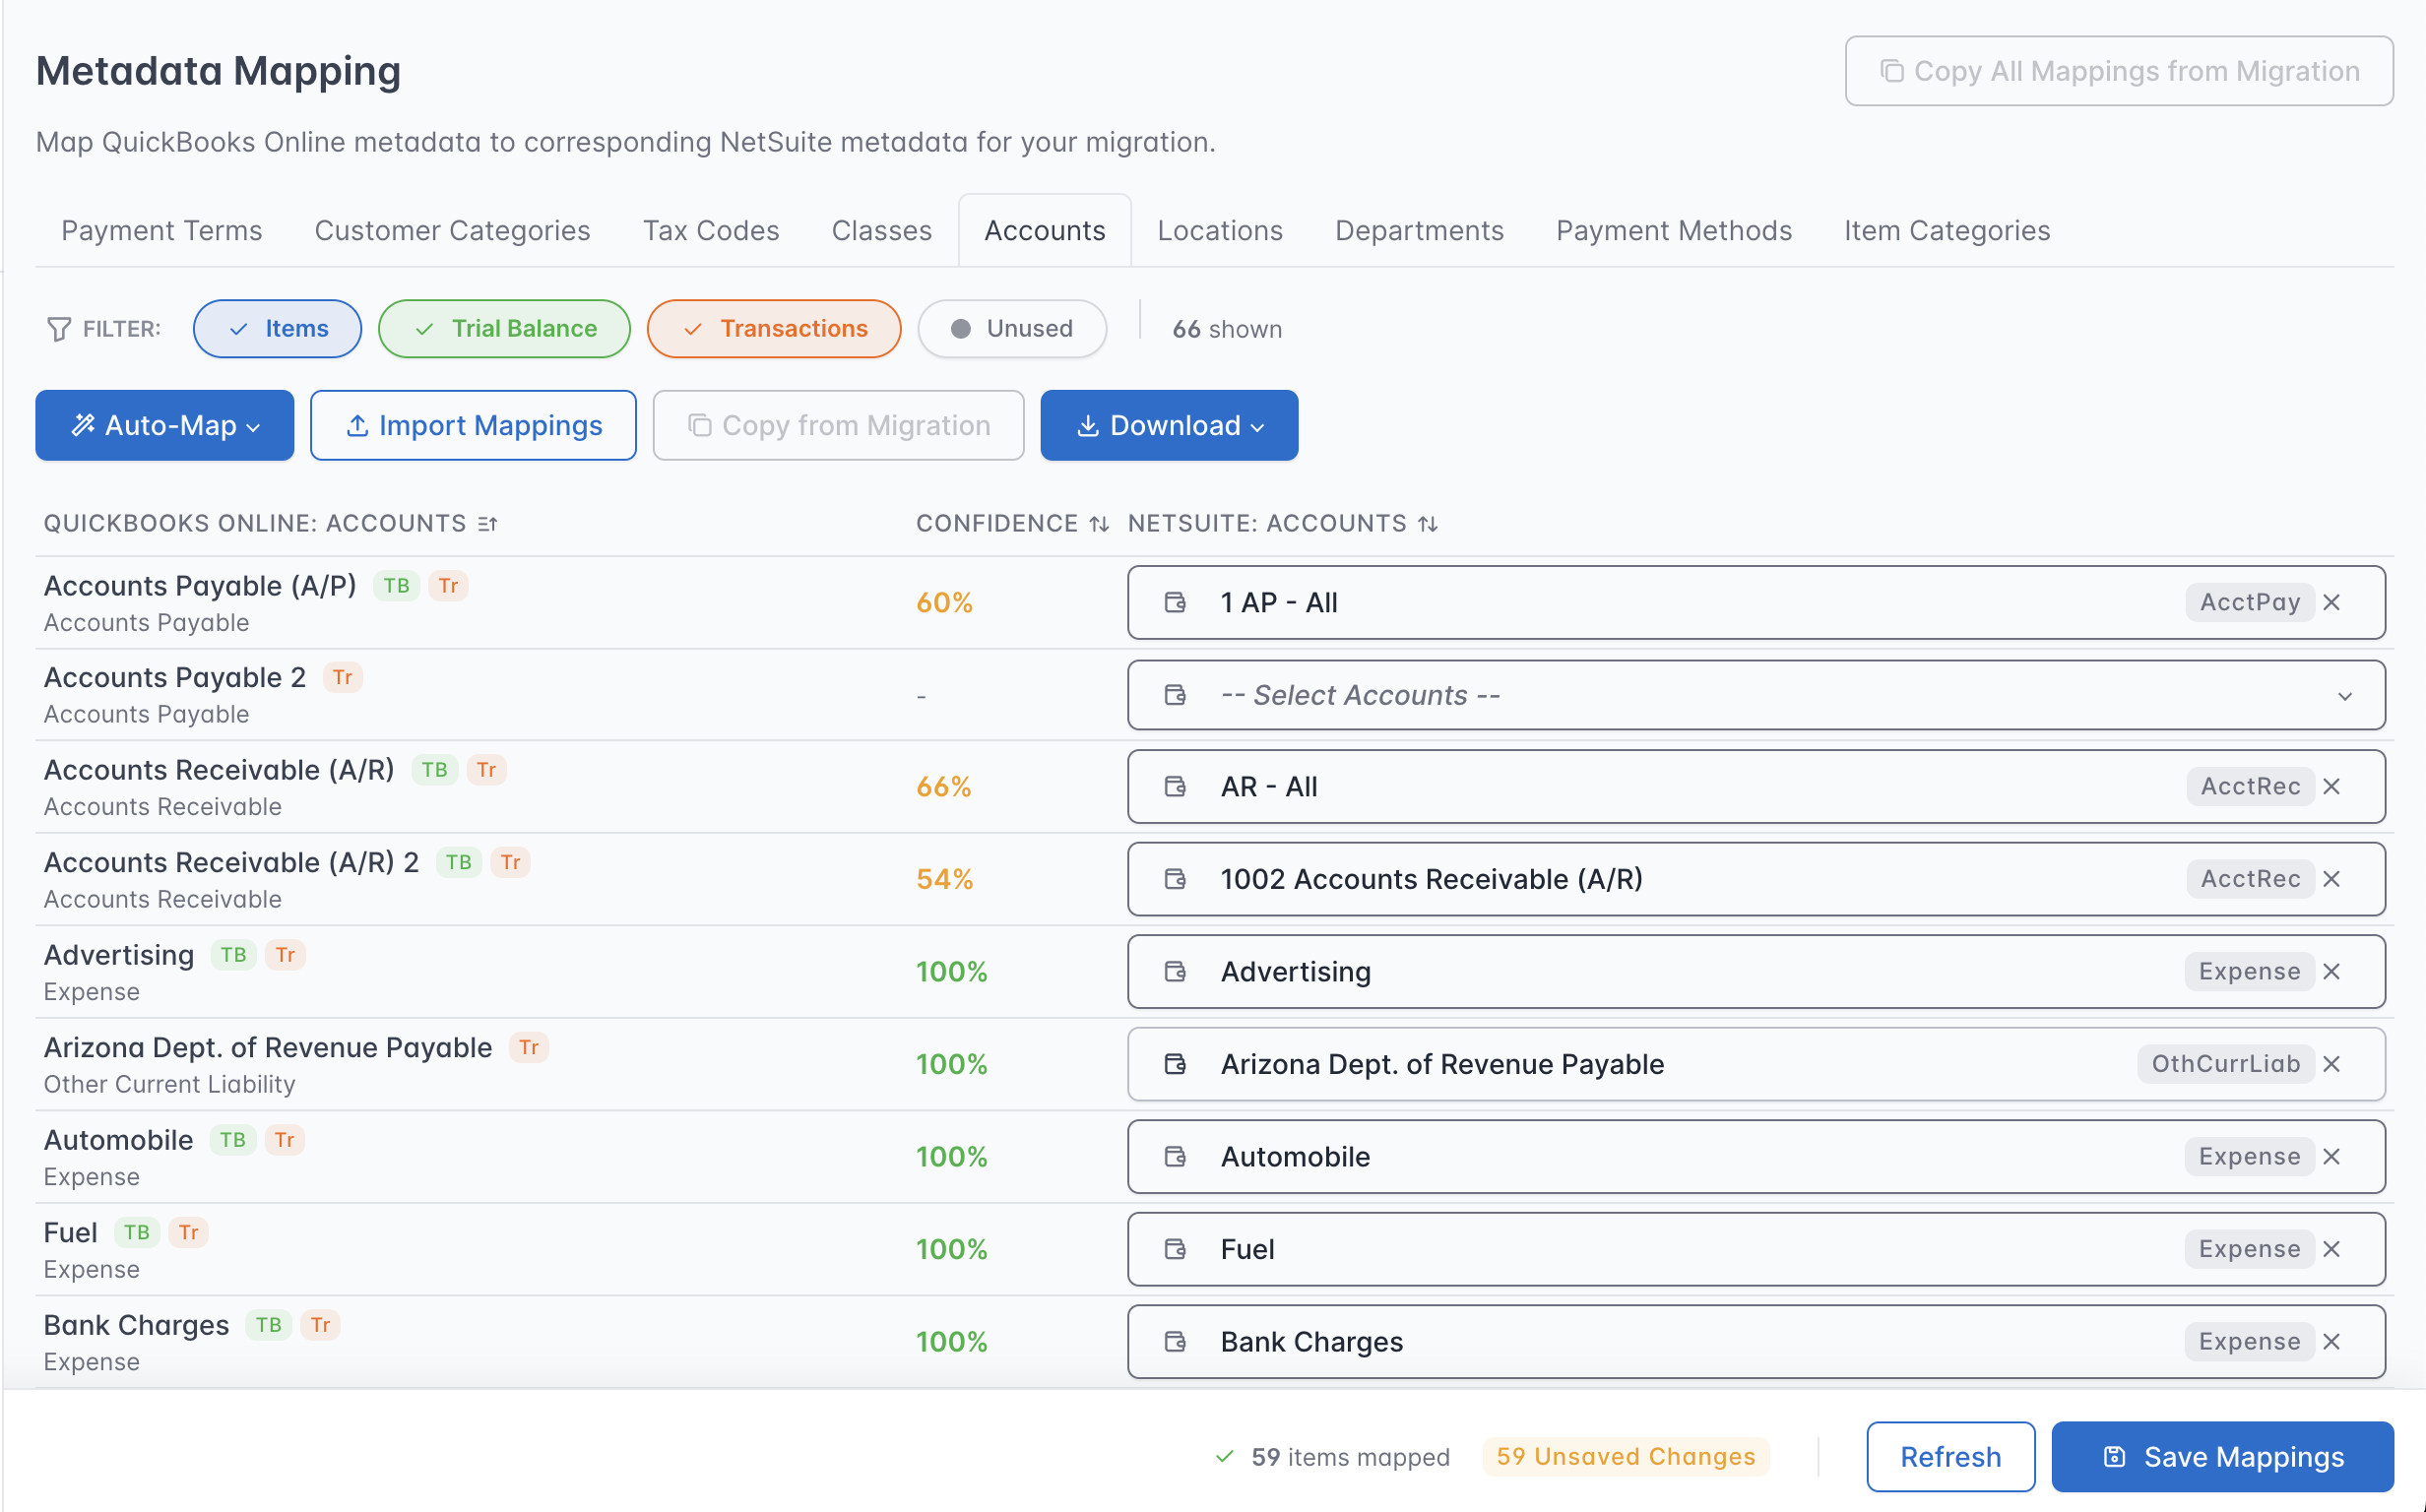
In the run above, the exact name matches come back at 100%. The A/P and A/R accounts, where the source and NetSuite names look nothing alike, come back in the 50 to 70% band. Check those carefully: each has to point at the right NetSuite account, and a plausible-looking suggestion is not the same as a correct one. Accounts Payable 2 gets no suggestion at all. Rows like that stay unmapped for you to fill in.
The run takes a minute or so and the tab is locked while it works, so do not refresh the page.
Import Mappings
Available on Accounts and Tax Codes. Best when someone wants to work the mapping in a spreadsheet, or when the list is long enough that the browser is the wrong tool.
- Click Import Mappings, then Download Template. The template comes prefilled with your source entries. On the Tax Codes tab, if Used only is active, the template is limited to the same set.
-
Fill in the destination code or name in the spreadsheet. If you give both, they have to point at the same account.
Leave the source column exactly as the template wrote it. Sub-accounts are exported fully qualified, so the template holds
Automobile:Fuelrather thanFuel, and shortening it means the row will not match. Type destination names exactly as they appear in NetSuite, for the same reason. 3. Upload the completed CSV and click Validate. 4. Review the results, then click Import N Valid Rows to apply them.
Validate does not import anything
Validate is a dry run. It checks the file and reports what would happen, without writing a single mapping. If you close the dialog at the results screen, nothing has been imported.
The results screen gives you a Total, Valid and Failed count, and lists each failed row with the row number and the reason. QuickBooks Online account not found points at the source column, NetSuite account not found at the destination one:
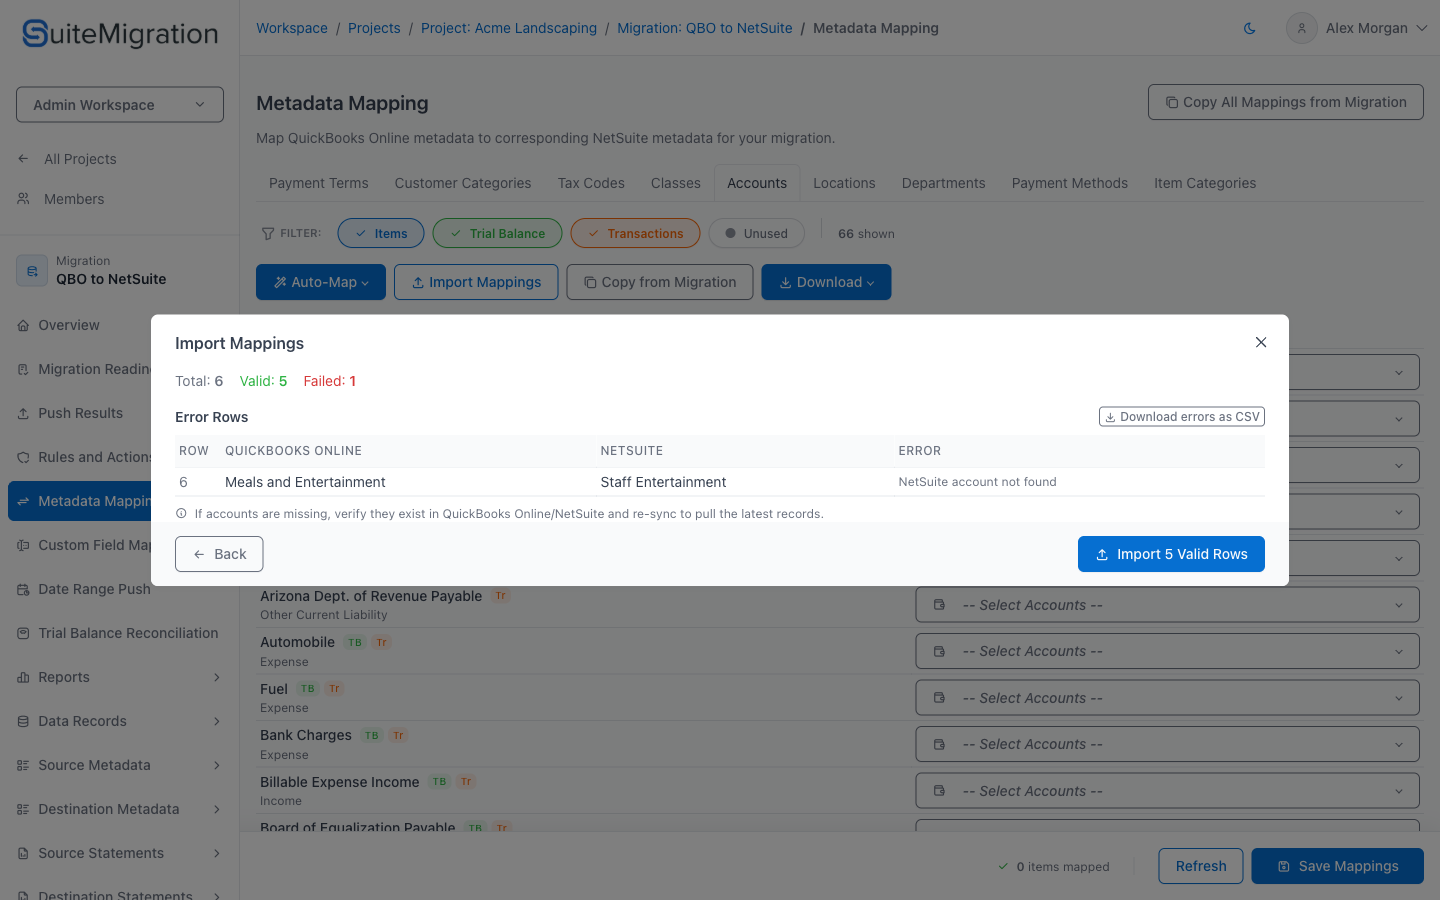
Download errors as CSV saves just the failed rows as import_errors.csv, so you can correct those and re-upload without touching the rest. Back returns you to the upload step.
Only when you click Import N Valid Rows are the valid rows written. The failed rows are skipped, so a partial import is fine: fix them and run the flow again.
Copy from Migration
If you have already mapped a sibling migration that is in the same project and uses the same source connection, you can reuse that work rather than redoing it.
Both conditions matter. A project can hold migrations from different source connections, and those are not offered as candidates. If the list comes up empty, that is usually why, not a bug. The dialog says which source connection it is looking for.
- Copy from Migration (inside a tab) copies just that metadata type.
- Copy All Mappings from Migration (top right) copies every mappable type at once.
Either way the flow is the same:
- Pick the migration you want to copy from. The list shows each sibling migration alongside how many mappings it holds.
- Click Preview Copy and review what is about to happen. The preview breaks the copy down per type into Add, Overwrite, Cleared, Unchanged, Needs review, and Not found, so you can see exactly what will change before anything does.
- Tick the confirmation checkbox, then click Confirm & Copy.
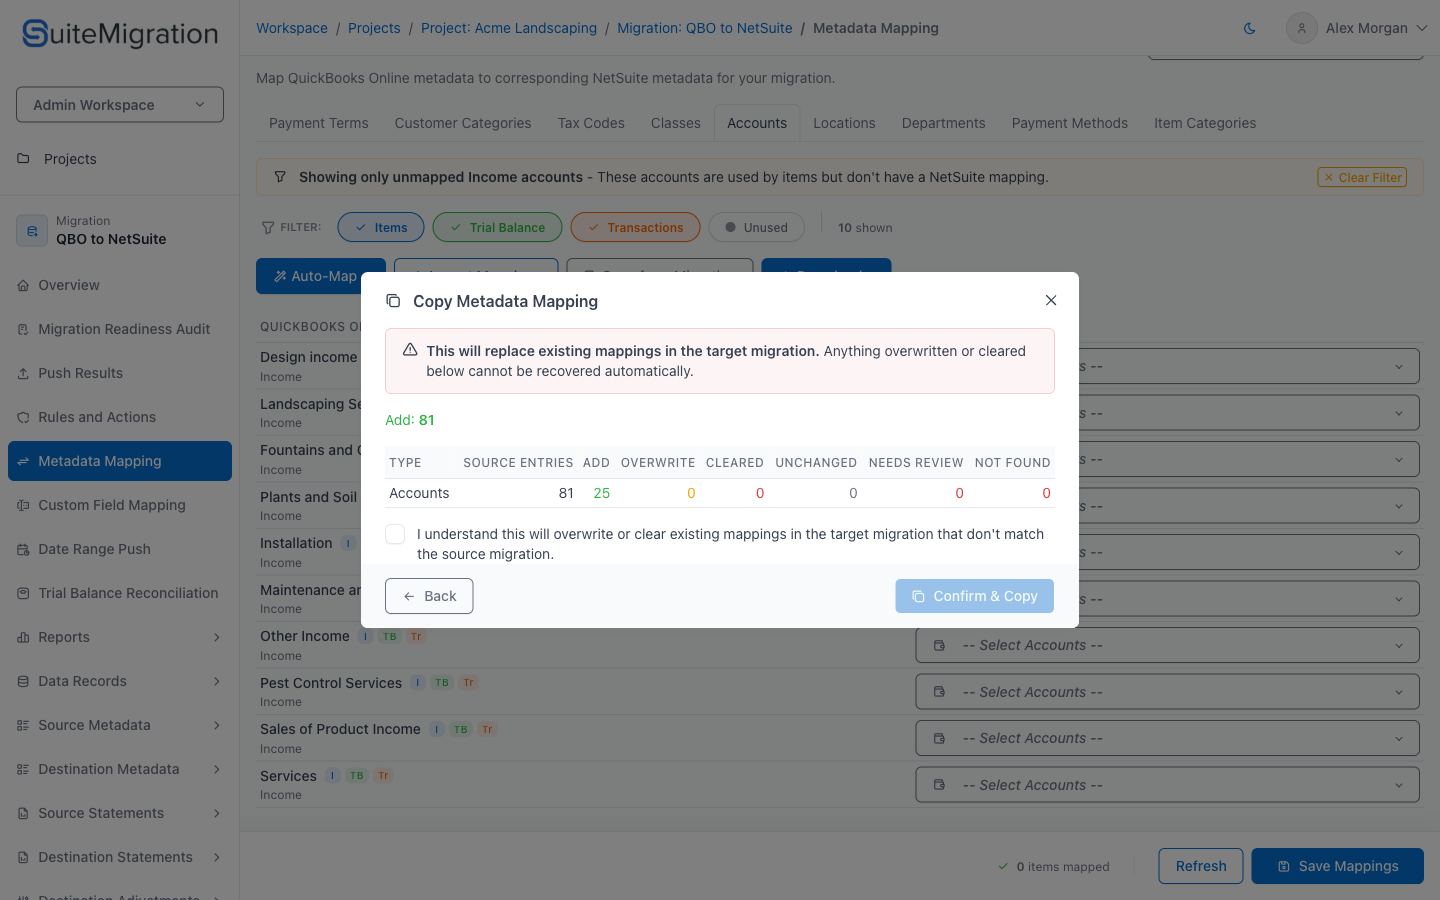
The checkbox is there because copying replaces existing mappings in this migration, and anything overwritten or cleared cannot be recovered automatically. Confirm & Copy stays disabled until you tick it. Read the preview if you have already mapped anything here by hand, and check the Overwrite and Cleared columns.
Both buttons are disabled while you have unsaved changes. Save or refresh first.
Download
Download Source <tab name> gives you the raw source list for the current tab, so on Accounts the button reads Download Source Accounts and on Tax Codes Download Source Tax Codes. Download Mappings gives you the current mapping set.
On Accounts and Tax Codes both sit under a single Download dropdown; elsewhere they are two separate buttons. Useful for reviewing with an accountant, or for keeping a record of what was mapped.
Warnings and how to resolve them
Account type mismatch
When you map a source account to a NetSuite account of a different category, for example an expense account mapped to an income account, the row is tinted red and gets a warning triangle. Hovering it tells you the mapped NetSuite account is a different type than the source account.
On save, SuiteMigration stops and shows an Account Type Mismatch summary listing every affected row with both types side by side. From there you can go Back and correct the mappings, or Save Anyway if the mismatch is intentional.
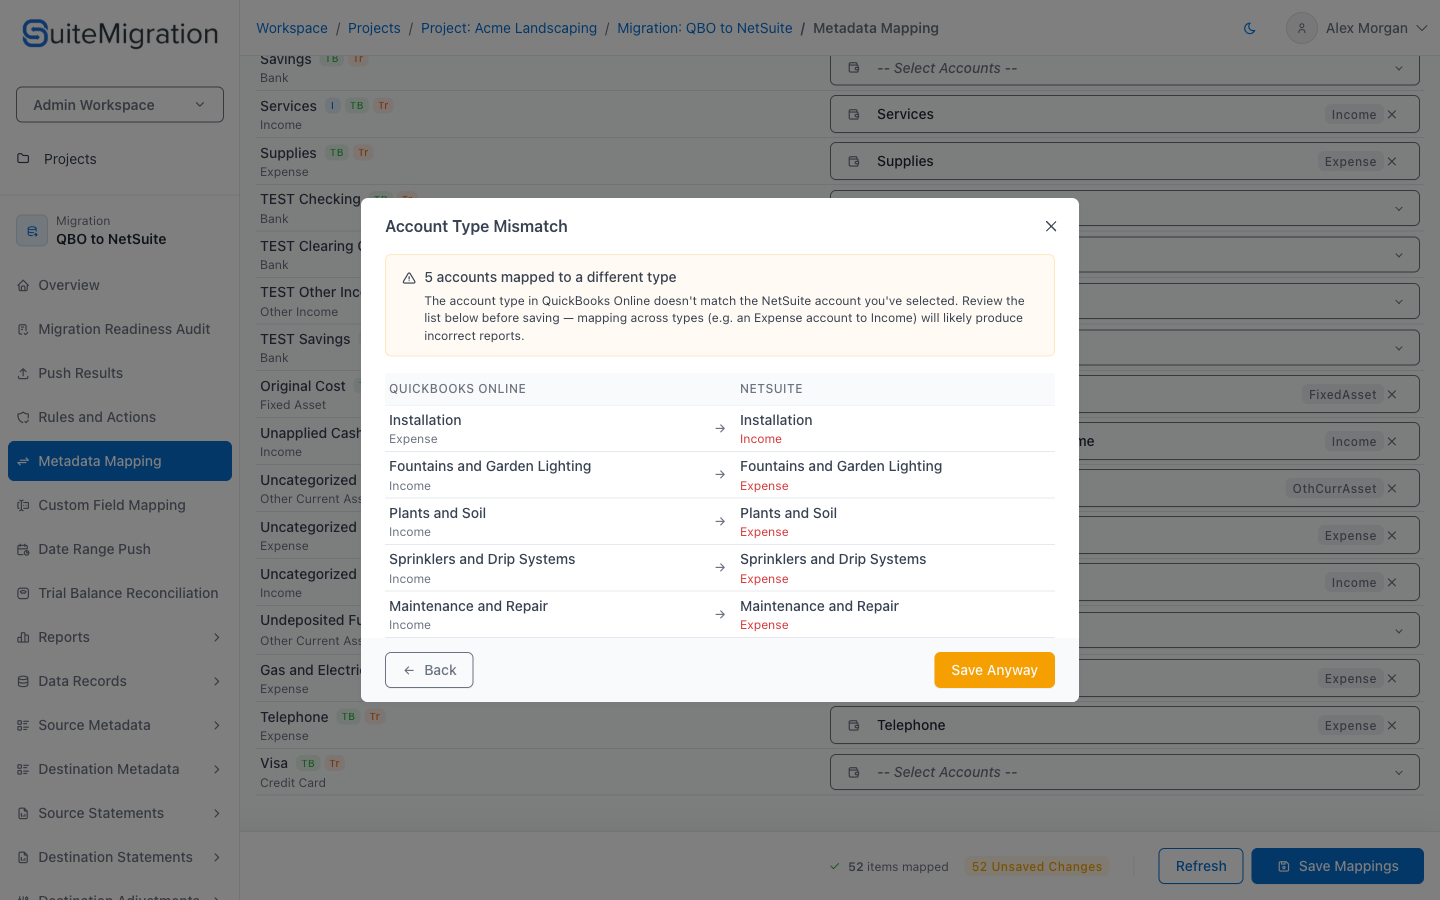
This one catches people out after an Auto-Map by Name run in particular. Names that match exactly across the two systems can still sit under different account types, as in the Installation and Plants and Soil rows above.
Sometimes the mismatch is what you want. Charts of accounts get restructured during a migration, and reclassifying an account is a fair reason to save through the warning. Check that you meant it, though. A mismatched account posts transactions to the wrong section of your financial statements, and you will meet it again later as a reconciliation difference that is much harder to trace.
Could not match after relinking
A red triangle with "Could not match destination by name after relinking of destination" means the mapping existed before, but the destination NetSuite connection was relinked and the previously mapped record could not be found again by name. The dropdown for those rows reads Re-map instead of Select. Pick the correct NetSuite record again and save.
Arriving from a filtered link
Rules and Actions links into this page with a filter already applied, so you only see the rows a particular rule flagged. The Migration Readiness Audit reports the same rules but does not link here itself; its rule rows link to a support article where one exists, and the view and action controls live on Rules and Actions.
When you arrive from one of those links, a yellow banner at the top explains what you are looking at:
- Showing only unmapped accounts means these accounts are used by items but have no NetSuite mapping. The banner also names an account type when the link narrowed it further.
- Showing accounts flagged by a rule name means these accounts need re-mapping to a compatible NetSuite account type or subtype.
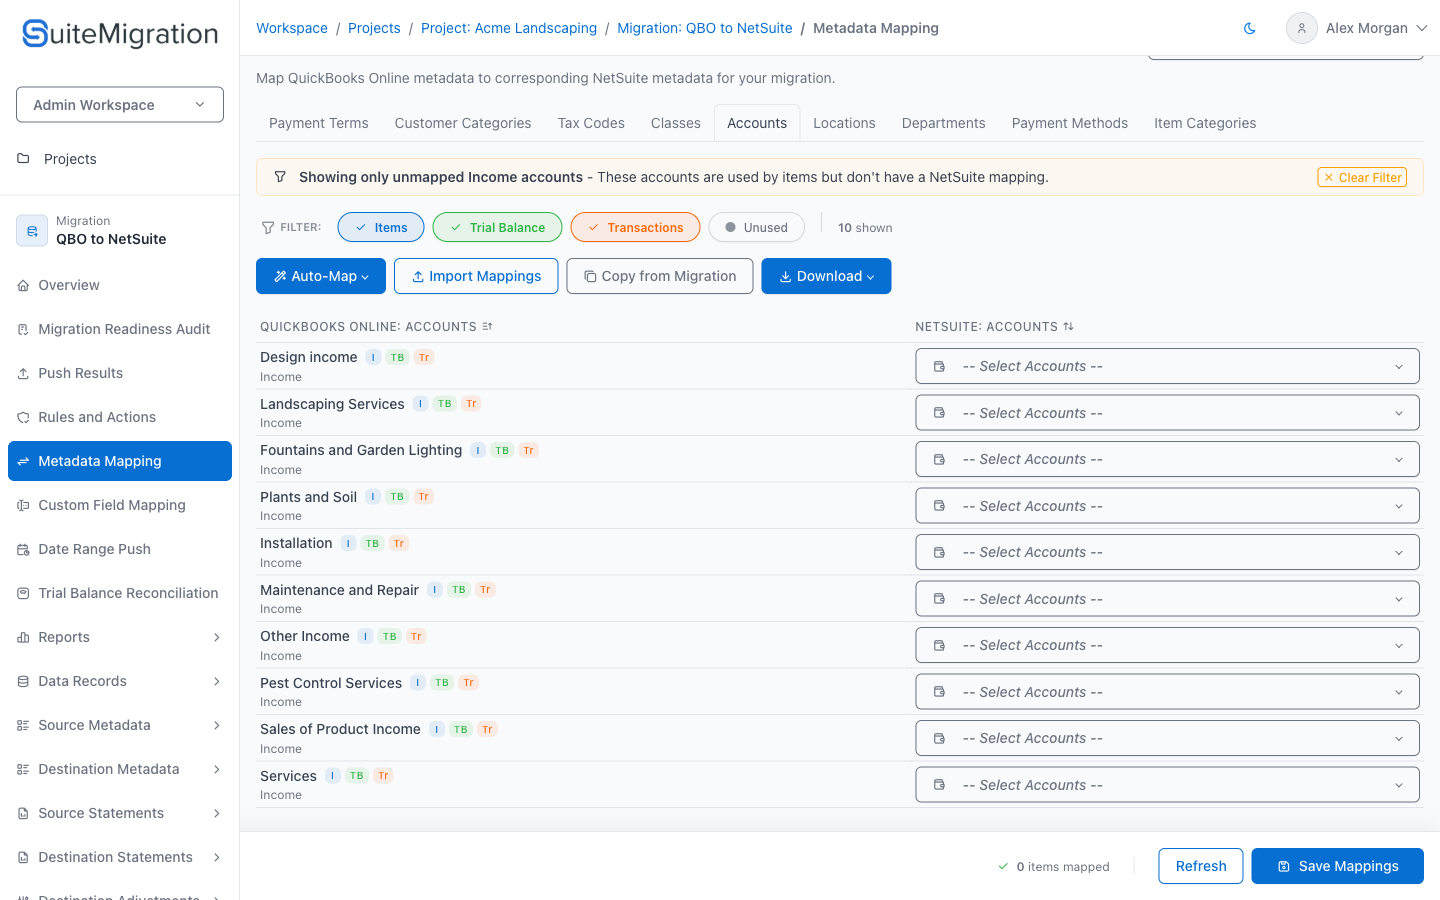
Work through the filtered list and save. When the last one is handled, the page reruns the underlying check and shows a green confirmation that nothing is left, so you know you are genuinely done rather than just looking at an empty filter. Clear Filter returns you to the full list.
When you are done
Mapping is not a one-time step. New accounts, tax codes, or classes created in the source after your last sync will appear here as unmapped rows the next time you resync, so it is worth a quick pass before each push.
Once the mappable tabs are mapped and saved, run the Migration Readiness Audit and the NetSuite pre-checks. Between them they will tell you whether anything is still unmapped or mapped incompatibly before you push. Use Rules and Actions to work through whatever they flag.