Set Up SuiteTax in NetSuite
This article applies to QuickBooks Online → NetSuite migrations. The tax behaviour described here is specific to how SuiteMigration reads QuickBooks Online tax detail. If you're migrating from a different source system, none of it applies — and because enabling SuiteTax cannot be undone, contact support before changing anything in NetSuite.
SuiteMigration pushes tax on QuickBooks Online invoices, cash sales, credit memos, and cash refunds using NetSuite's SuiteTax fields. Each tax component on a QuickBooks Online transaction is sent as its own tax detail line, carrying both a NetSuite tax code and that code's tax type — and a tax code only has a tax type in a SuiteTax account. So if your NetSuite account still runs Legacy Tax, taxable invoices, cash sales, and credit memos will not push.
Cash refunds are the exception. They don't use the per-component SuiteTax path at all. SuiteMigration pushes their tax through NetSuite's Legacy Tax fields instead — isTaxable, taxItem, and a single effective taxRate — which needs a mapped tax code but no tax type, so it works on a Legacy Tax account. If your migration only carries taxable cash refunds, you don't need SuiteTax — and since enabling it can't be undone, confirm you actually need it before continuing.
One caveat on cash refunds. A single tax code has to be able to represent the whole refund: either the refund's parent tax code is mapped, or all of its component rates resolve to the same NetSuite tax code. A refund whose tax genuinely spans two or more different NetSuite tax codes can't be expressed in one legacy tax field, and will push without tax detail rather than failing. Check those refunds in NetSuite after migrating and add the tax manually if it's missing.
Overview
Getting from a Legacy Tax account to a working tax push is four phases:
- Enable the SuiteTax feature in NetSuite.
- Install a tax engine and assign it to each of your tax registrations.
- Set up nexuses, tax types, and tax codes.
- Finish the setup in SuiteMigration — resync destination metadata and map your tax rates.
Enabling SuiteTax cannot be undone. SuiteTax is a non-reversible, account-level NetSuite feature — it applies to the whole account, not to selected subsidiaries, and once it is on it can never be switched off. Enabling it also starts a background migration of your existing tax records, and taxable transactions are locked for creation and editing until the setup steps below are complete. Before you enable it in production:
- Test the change in a sandbox account first, especially if you already have transactions and tax records in NetSuite.
- Manually disable incompatible features and uninstall incompatible SuiteApps and bundles — NetSuite will not do this for you.
- Check that your other NetSuite integrations support SuiteTax.
- Confirm the change with your NetSuite account team. Only an administrator can enable the feature.
Step 1 — Enable the SuiteTax feature
- In NetSuite, go to Setup → Company → Enable Features.
- Open the Tax subtab.
-
Check SuiteTax.

-
Click Save.
NetSuite begins migrating your tax-related records in the background. Track it at Setup → Accounting → SuiteTax Migration — an administrator-only page with the Transaction Migration Status, a Migration Process Log of completed steps and any errors, and the SuiteTax Setup Confirmation section you'll come back to at the end of Step 3.
Taxable transactions stay locked for creation and editing until you confirm the setup there, so work through Steps 2 and 3 first.
Step 2 — Install a tax engine and assign it to your tax registrations
SuiteTax itself calculates nothing — a tax engine does, and every tax registration needs one before taxable transactions unlock. NetSuite's own SuiteTax Engine is free; partner engines are also available.
Install the SuiteTax Engine
- Go to Customization → SuiteBundler → Search & Install Bundles.
-
Search for
SuiteTax Engineand select the bundle with Bundle ID237702.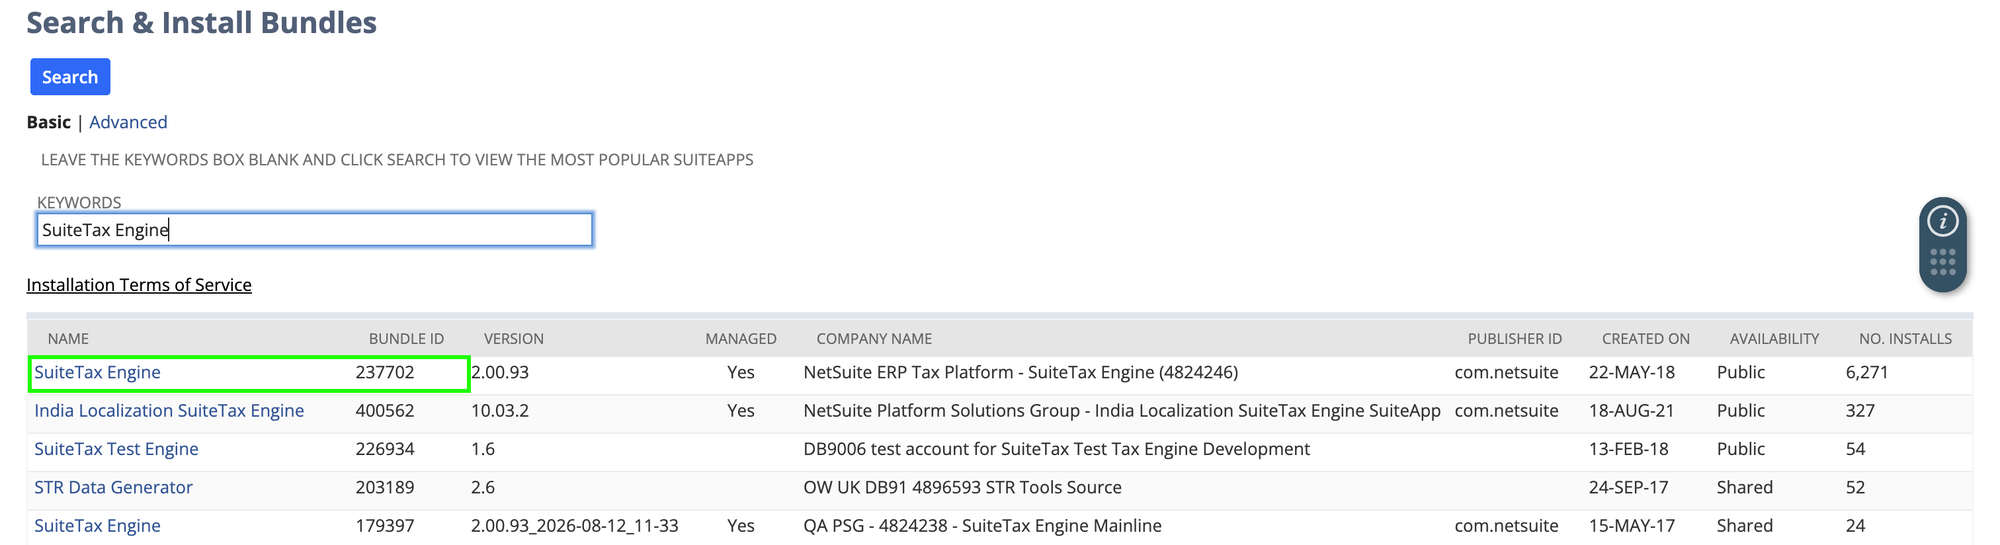
-
Click Install.
The SuiteTax Engine is a managed bundle, so NetSuite updates it for you. It also expects a few SuiteCloud features to be on — Item Options, Custom Records, Advanced PDF/HTML Templates, and SuiteFlow, all under Setup → Company → Enable Features → SuiteCloud. You will already have most of the SuiteCloud subtab enabled from Connect to NetSuite.
Assign the engine to each tax registration
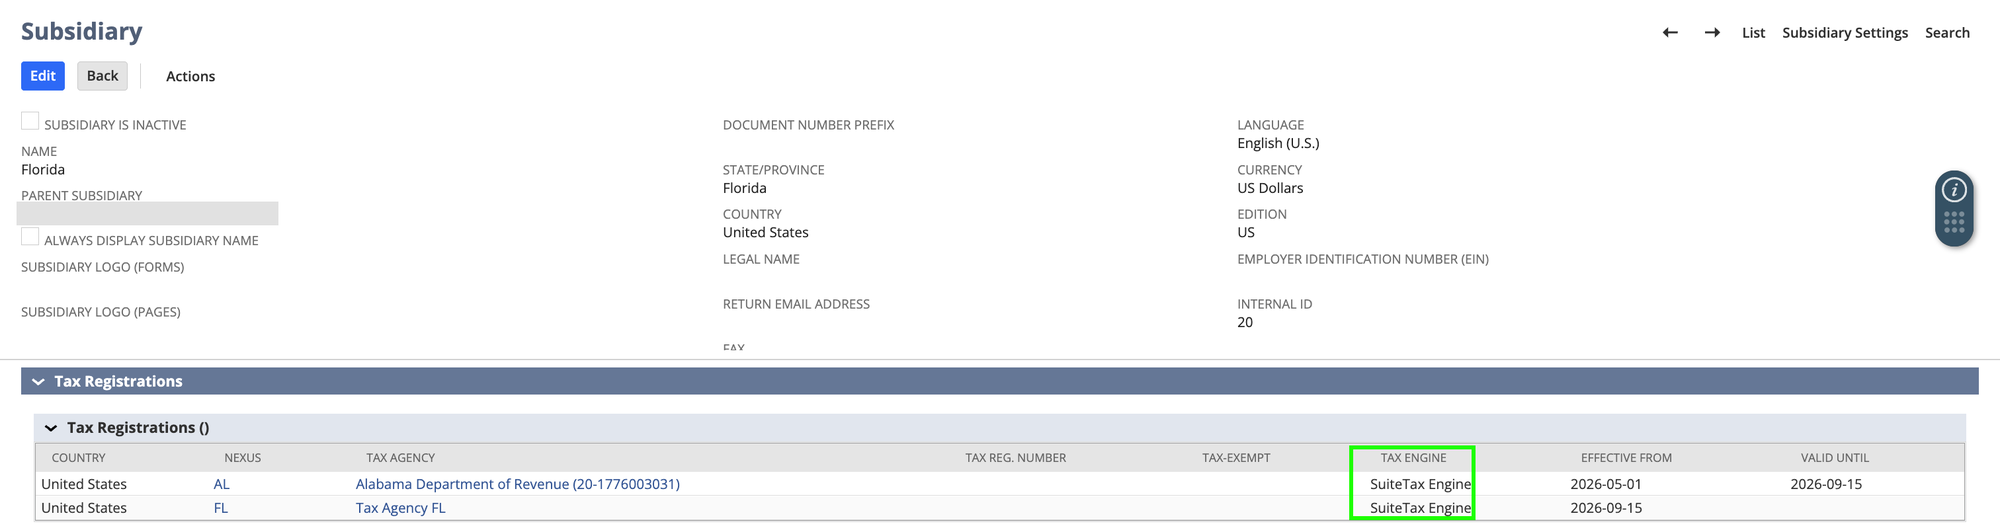
- Go to Setup → Company → Subsidiaries and click Edit on the subsidiary you're migrating into. On accounts without OneWorld, go to Setup → Company → Company Information instead.
- Open the Tax Registrations subtab.
-
Click the Tax Engine column on the tax registration line you want to set, choose your engine from the dropdown, and click OK.
-
Repeat for every tax registration that has no tax engine.
- Click Save.
If a nexus isn't used for tax: you can mark the nexus tax-exempt instead of assigning an engine. Note that SuiteMigration still needs real tax codes for any source transaction that carries tax — see Step 3.
Step 3 — Set up nexuses, tax types, and tax codes
A nexus is a tax jurisdiction you're registered in. Tax types and tax codes hang off it, so nexuses come first.
Create your nexuses
Go to Setup → Tax → Nexuses and create one nexus per jurisdiction, setting the Country and — where it applies — the State/Province/County. Then assign each nexus to the subsidiary as a tax registration, as in Step 2.
Let the engine provision your tax records
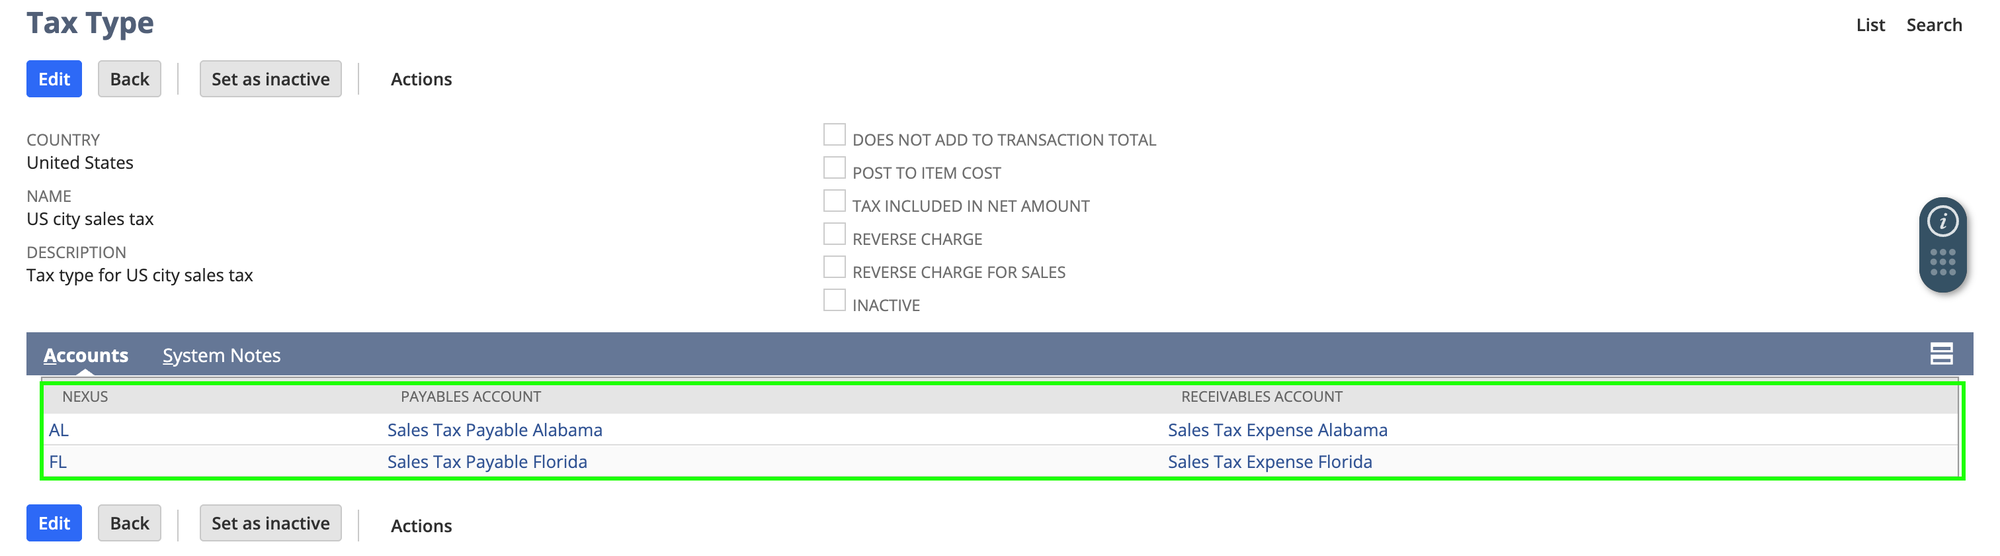
When you select the SuiteTax Engine for a subsidiary with a U.S. nexus, NetSuite provisions the tax records for that nexus automatically: a tax agency, the accounts that tax posts to, the tax types (State Tax, County Tax, City Tax, District Tax, and Not Liable), all tax codes applicable to the nexus, and tax groups by area.
Don't delete or inactivate the system-generated tax accounts — NetSuite recreates them on its monthly updates. Rename them, or create your own accounts and assign them to your tax types.
- View tax types at Setup → Tax → Tax Types.
- View tax codes at Setup → Tax → Tax Codes.
Each provisioned tax type carries the accounts that tax posts to, one pair per nexus — open a tax type and check its Accounts subtab:
Confirm every tax code has a tax type
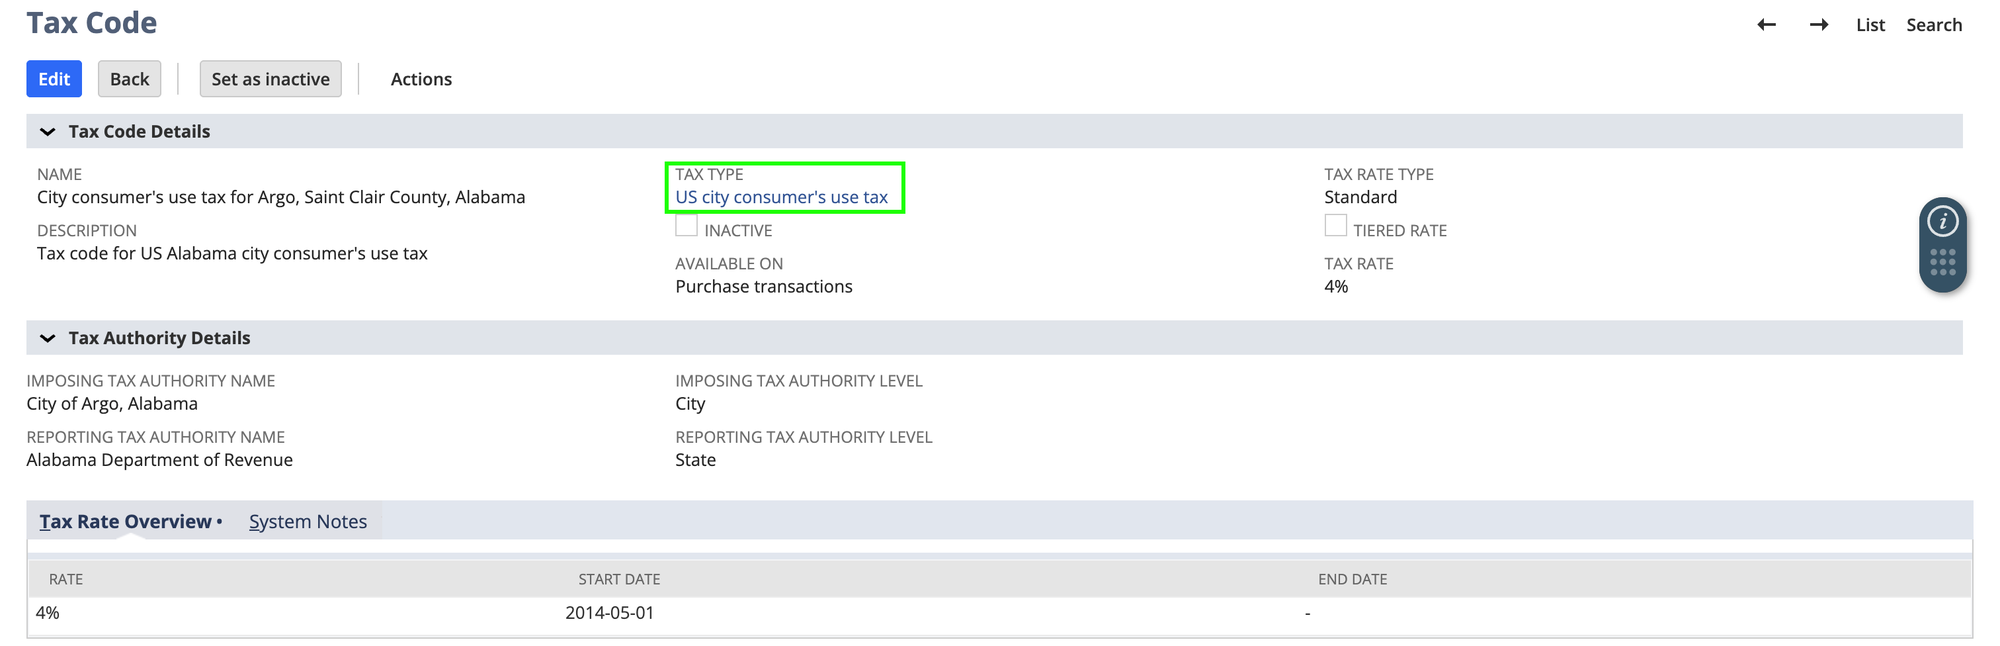
This is the one check that matters most for SuiteMigration. SuiteMigration reads each destination tax code's Tax Type and sends it alongside the tax code on every tax detail line it pushes. A tax code with no tax type cannot be used, and any source transaction mapped to it fails to push.
Open Setup → Tax → Tax Codes, and for each tax code you plan to map, confirm the Tax Type field is populated. Provisioned tax codes always have one. Tax Type is a required field when you create a tax code by hand — and NetSuite locks it once the record is saved, so a tax code that ends up on the wrong tax type has to be replaced rather than corrected.
Tax schedules — usually nothing to do
In SuiteTax, tax schedules are optional. The nexus default tax codes determine how items are taxed, and a tax schedule is only needed when some particular goods or services must use a tax code other than the nexus default. Most accounts have no tax schedules at all, and that's fine — you can skip this and move to Step 4.
If you do need one, the SuiteTax Engine's schedules live at Setup → SuiteTax Engine → Tax Schedules, and you can point SuiteMigration at it from the Tax Schedule setting described in Step 4.
Confirm your SuiteTax setup
This is the gate that unlocks everything else. Taxable transactions remain locked for creation and editing until you tell NetSuite the setup is complete — which means SuiteMigration cannot push them either, no matter how well your mappings are configured.
- Go to Setup → Accounting → SuiteTax Migration. The page is administrator-only.
- Check the Migration Process Log for errors and the Transaction Migration Status for progress.
- In the SuiteTax Setup Confirmation section, click Confirm SuiteTax Setup.
On historical transactions: NetSuite migrates the last three years of transactions asynchronously, and migrates older ones on demand as you open them — so don't be alarmed if long-past records look untouched. Per-record progress is at Setup → Company → Bulk Processing Status List.
Step 4 — Finish the setup in SuiteMigration
Resync your destination metadata
SuiteMigration caches your NetSuite tax codes, including each one's tax type. Metadata pulled before you enabled SuiteTax has no tax types in it, so every taxable transaction will keep failing even though NetSuite is now configured correctly.
- In SuiteMigration, open your migration and go to Connections.
- Open your NetSuite destination connection.
-
Click Resync Data.

Do this after enabling SuiteTax, and again any time you add or change tax codes in NetSuite.
Set the Tax Schedule, if you use one
The Tax Schedule setting is optional. Leave it empty unless you set up a tax schedule in Step 3 — when it's blank, SuiteMigration simply pushes items without a tax schedule and NetSuite taxes them by the nexus default tax codes.
To set one:
- Open your migration's Settings.
- Under Item Settings, enter the internal ID of your tax schedule in the Tax Schedule field. The URL link under the field opens the Tax Schedules list in your NetSuite account, where you can look the ID up.
- Save the settings.
If the list has no internal IDs: turn on Home → Set Preferences → General → Show Internal IDs in NetSuite, then reload the list.
Map your tax rates
- Open your migration and go to Metadata Mapping.
- Open the Tax Codes tab.
- Map each source row to a NetSuite tax code.
Two things about this tab are worth knowing:
- The tab is labeled Tax Codes, but the rows on the source side are your source system's tax rates, mapped to NetSuite tax codes. That's deliberate: NetSuite tax codes are per-rate, so a source tax rate is the right counterpart.
- Combined and group taxes must be mapped component by component. SuiteMigration ignores the parent tax code on the transaction and resolves each component rate separately, so it gets the GL impact right for each one. If even one component is unmapped, the whole transaction fails rather than push with partial tax — so map every component rate individually, not just the group. (The components don't necessarily end up as separate rows in NetSuite; see Checking the result in NetSuite.)
To move faster, use Auto-Map by Name or Auto-Map by AI from the Auto-Map dropdown, or Import Mappings to upload a CSV with the columns Source Tax Rate Name and Destination Tax Code Name.
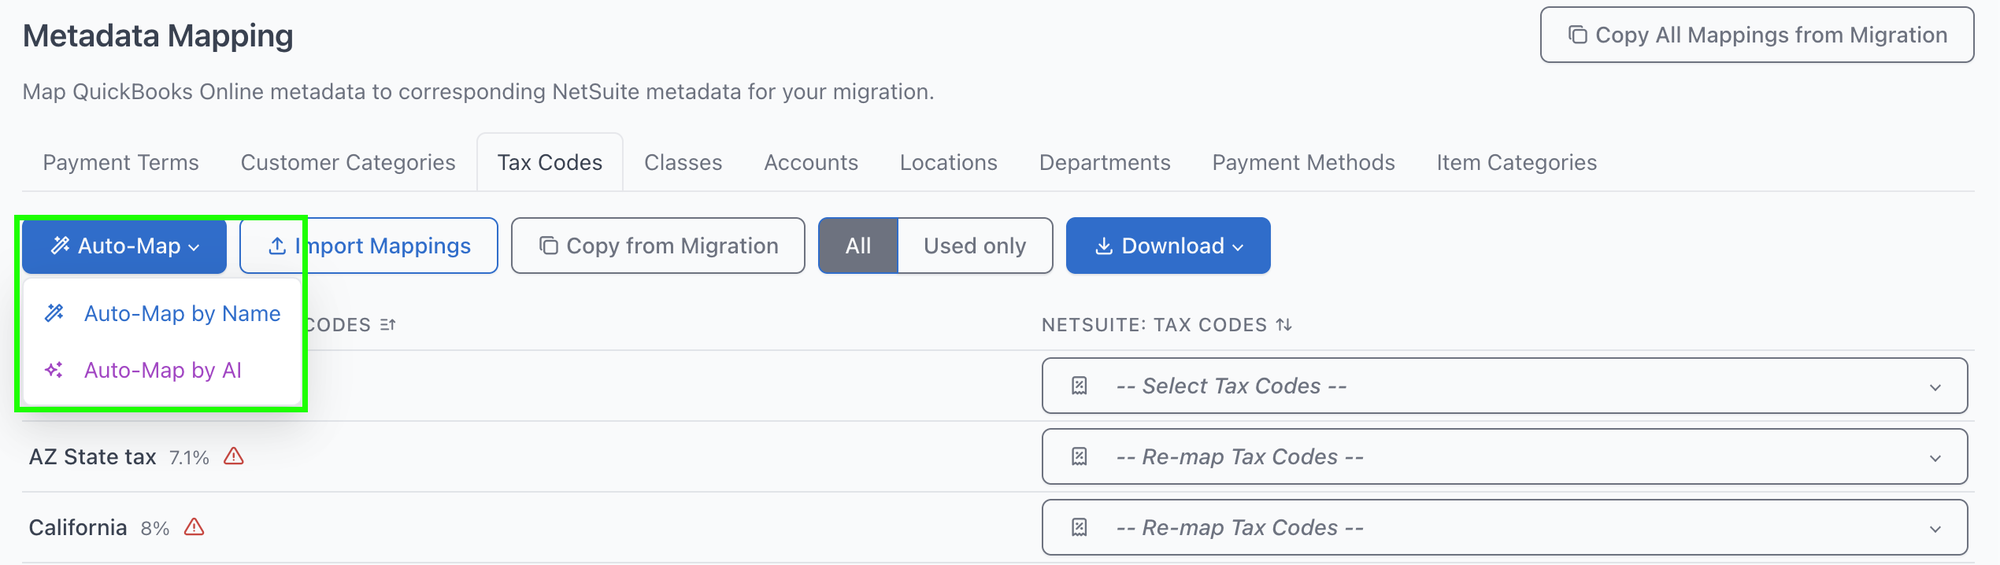
Read each row's right-hand column to see where it stands:
| The row shows | State | What to do |
|---|---|---|
| A NetSuite tax code name | Mapped | Nothing — just confirm it's a tax code for the right nexus. |
| -- Select Tax Codes -- | Never mapped | Pick a NetSuite tax code. |
| -- Re-map Tax Codes -- with a red ⚠ | Mapping lost — the rate had a mapping, but relinking the destination connection leaves SuiteMigration unable to re-match the tax code by name | Pick the tax code again. |
Both unmapped states count the same to the push: any taxable transaction using that rate will fail.

Checking the result in NetSuite
Once a taxable invoice, cash sale, or credit memo has pushed, open it in NetSuite and click the Tax Details subtab. The Taxes sublist there is the clearest confirmation that your setup is right: each row carries its own Tax Type and Tax Code alongside the rate and amount it contributed, and every row references the transaction line it applies to.
Cash refunds won't have these rows — they carry Legacy Tax fields instead, as described at the top of this article. Check a refund's tax on the record itself rather than in the Taxes sublist.
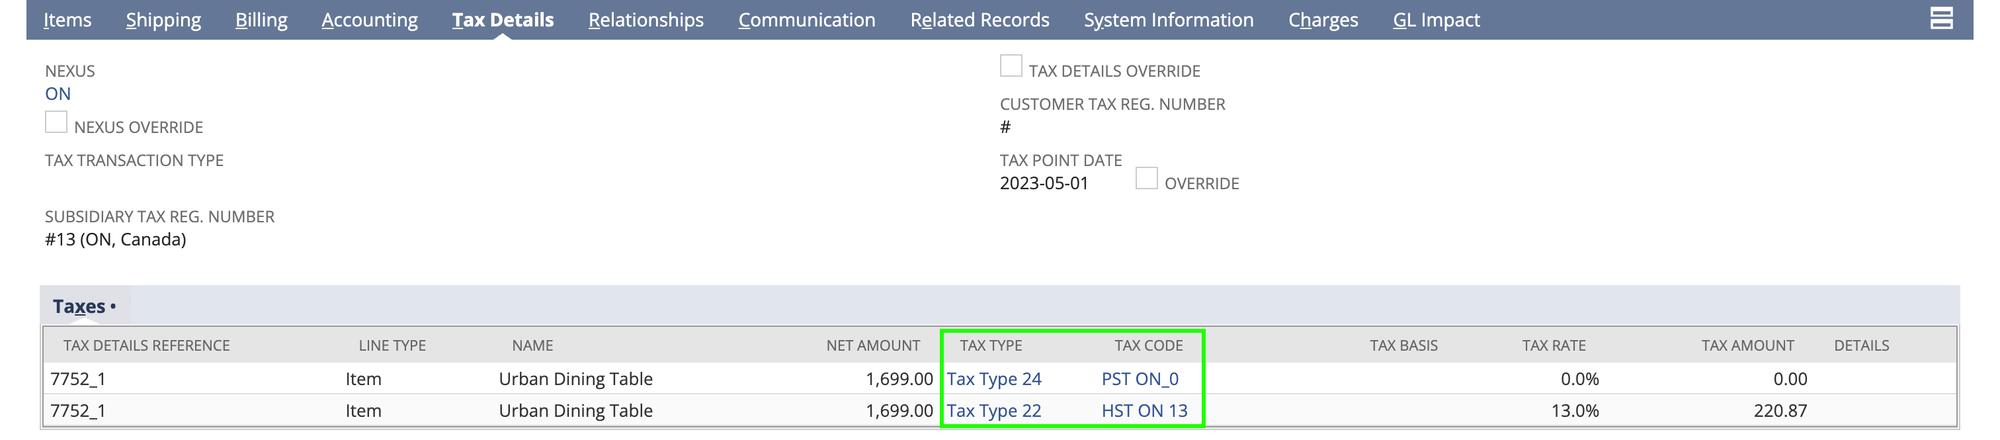
Don't expect a row per source component. Several rows against the same Tax Details Reference are normal for a combined or group tax, but the count won't always match the source transaction, because SuiteMigration deliberately consolidates:
- Zero-amount components are dropped. A component that contributes no tax to a line gets no row — so a source 0% + 13% pair usually arrives as a single 13% row.
- Components sharing a NetSuite tax code are merged. When two source rates map to the same tax code on the same line, they become one row with the amounts summed and the rate recalculated to the combined effective rate. NetSuite rejects two rows with the same tax code against one reference, so this consolidation is what keeps the record valid.
What matters is that the total tax matches the source transaction and that each row's tax code and tax type are the ones you intended. A missing row is only a problem if tax is actually understated.
What lands as a Journal Entry regardless
Some tax transactions become Journal Entries in NetSuite no matter which tax engine you run. This is expected, not a setup problem — NetSuite's web services expose no tax-payment transaction at all, only the tax setup records, and there is no standalone tax-adjustment record in either tax engine (Legacy Tax puts an Adjustment column on the Sales Tax Payment; SuiteTax puts an adjustment account on the Tax Liability Payment).
So Sales Tax Payments, Sales Tax Adjustments, and Tax Payments will always migrate as Journal Entries. SuiteMigration explains why on each one, so after the push you'll find this note on the NetSuite record:
| Transaction type | Note on the NetSuite record |
|---|---|
| Sales Tax Payment | NetSuite has no Sales Tax Payment record, so this was migrated as a Journal Entry. |
| Sales Tax Adjustment | NetSuite has no Sales Tax Adjustment record, so this was migrated as a Journal Entry. |
| Tax Payment | NetSuite has no Tax Payment record, so this was migrated as a Journal Entry. |
Troubleshooting
If a taxable transaction fails to push, the error on the Push Results report will be one of these.
| Error | Cause | Fix |
|---|---|---|
Missing taxcode/taxType mapping for QBO TaxRateRef …; combined tax push requires every component to be mapped for correct GL impact |
A component tax rate isn't mapped, or the NetSuite tax code it maps to has no tax type. | Map every component rate on the Tax Codes tab. Confirm the mapped NetSuite tax code has a Tax Type, then Resync Data on the destination connection so the tax type reaches SuiteMigration. |
Tax amount mismatch: calculated … != QBO TotalTax …; … will not be pushed |
The source transaction's own tax numbers don't reconcile: its per-component tax amounts don't add up to its stated tax total, beyond a two-cent tolerance. This is checked before anything is sent to NetSuite, so your NetSuite tax codes and mappings have no bearing on it. | Open the transaction in the source system and reconcile its tax detail against its tax total — then resync the source data and push again. Re-mapping tax codes will not clear this error. |
Invalid tax type reference key -5 for Nexus (the key varies) |
The mapped NetSuite tax code's tax type isn't valid for the nexus on the transaction. A negative key like -5 points at a built-in tax type rather than one provisioned for that nexus, which usually means the tax code is a leftover from before SuiteTax rather than a provisioned SuiteTax tax code. |
Re-map the source rate to a tax code provisioned for the nexus the transaction's subsidiary is registered in — see Nexus alignment below — then Resync Data. |
Please enter value(s) for: Tax Rate |
NetSuite rejected a line whose tax reference has no matching tax detail. | Usually clears once every component is mapped and the destination metadata is resynced. |
TaxLine is missing TaxRateRef.value; cannot resolve component tax code mapping |
A tax line on the source transaction carries no tax rate reference, so there's nothing to map it to. | Check the transaction in the source system and correct its tax lines. |
Nexus alignment
Having a tax type isn't enough on its own — the tax code also has to belong to a nexus that the transaction's subsidiary is registered in. NetSuite validates the tax type against that nexus when it saves the record, and rejects the transaction if they don't line up.
Two things make this go wrong:
- Legacy leftovers. Tax codes that predate SuiteTax survive the migration but aren't attached to a provisioned nexus. They look mappable on the Tax Codes tab and fail on push.
- Cross-nexus mappings. Mapping a source rate for one jurisdiction to a tax code provisioned for another — a California rate onto an Alabama tax code, say — fails even though both tax codes are valid SuiteTax records.
When re-mapping, open Setup → Tax → Tax Codes in NetSuite and confirm the tax code you're about to pick belongs to the nexus you expect, and that the nexus appears on the subsidiary's Tax Registrations subtab from Step 2.
Still failing?
A failure that persists after a Resync Data is usually a tax code missing its Tax Type in NetSuite — that's worth checking twice, because SuiteMigration cannot tell the difference between a tax code that has no tax type and one whose tax type it hasn't pulled yet.
Contact support@suitemigration.com if you need help.